Trying to play a little catch up with the CEO Mommy class, hence the back-to-back posts. In August's class was the first time I actually remembered to take photos during the class {thank you Cara for reminding me}. I'm so excited to share what the class looks like in action. August's class was dedicated to creating our very own round serving tray.
 Here are the supplies you will need:
Step 1: Apply a base coat to the tray
I spray painted everyone's tray with white primer before the class because the wood has grain and dark spots that can show through the painted design. Adding the primer prevents needing to paint numerous coats to cover any dark areas your wood may have.
And as always, safety first when spray-painting {especially if you're spray painting numerous items}.

Step 2: Mark the dill holes
You will notice in my pictures that I painted my tray before drilling, bad idea. The wood is likely to chip a little bit when drilling. Not such a big deal if you're about to paint over it, but if it's already been designed it can really mess up your tray.
 An easy way to mark drill holes is to use an ink pad. Measuring the exact spot can be difficult, at least for me, so using the ink pad really helps prevent drilling in the wrong place.
 Simply pay the handle onto the ink pad, then press it onto the tray where you'd like the handle to be.


Step 3: Drill the holes
Don't worry about the ink showing on the board. Not only are you about to paint over it, but the handles will also cover where the marked holes will be. So now you want to drill right where the marked holes are.
 Place the tray off the side of a table or bench, as you will be drilling all the way through the wood. Although in this image the tray appears to be laying flat on a surface, it is actually elevated with our wood floors about three feet below.
Step 4: Prepare to paint
The way you go about this depends on what design you would like to make. For my red and white striped tray, I simply taped off stripes every few inches using painter's tape. Then painted the exposed area red. Don't forget to paint the sides!
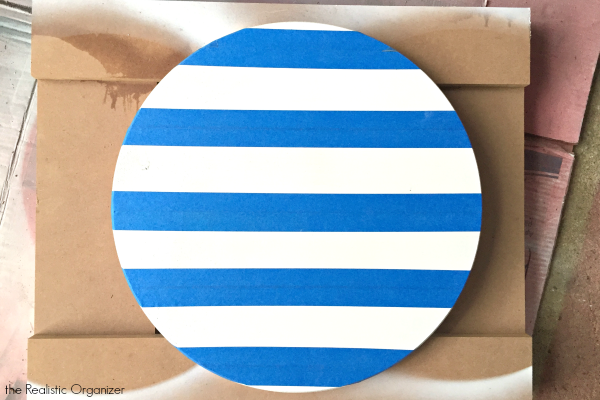 Once the tape was removed, I had perfect red and white stripes to make a nautical tray.
 For other designs, such as the lemon, I added an additional coat of white paint to the base. I cut out three large rectangular shapes then traced them with pencil onto my tray. I mixed yellow paint with a small amount of white to create a lighter shade, and then painted the traced rectangles. Next, paint the sides using unmixed yellow paint.
For the watermelon, I painted the side green, using a mix of green with white paint. Then painted the entire center a melon color. This was created by mixing red with white and a little pink actually. Then, with a small brush, add black marks for the seeds.
 Step 5: Finishing Touches
It's not expected that every paint project will go perfectly, which is why I own paint pens in just about every color. I used these pens to cover small errors and where I painted outside the lines.
 Spray a coat of Polycrylic finisher on the tray once you are done painting. This will protect the wood.
 Then you can attach the handles using the 1-1/8in screws. The screws that come with the handles are either too long or too short to use with this wood, unfortunately.
Lastly, a couple optional finishes you can add. Either add small felt pads to the bottom of the tray to place over the screws. This will prevent the screws from scratching up any surface and allow the tray to slide nicely on tabletops and counters, OR you can add a Lazy Susan attachment! Now you have a custom made, turning tray, that is also turning heads! :)
 Check out these mommas creating some amazing trays!


 My favorite part about this class was how different everyone's projects were. What design would you create for your serving tray?
 Want to join in on the fun? Join the CEO Mommy Facebook group to sign up for the next class and check out what fun projects we're creating!
 Check out what we've created in previous classes here!
Thanks for visiting!
 |
Wood Round {1x17.75in}/ Drill/ Cabinet Pull {more colors available}/ 1-3/8in Screws/
Paint {primer/acrylic/pens}/ Polycrylic Spray/ Brushes/ Ink pad |
I spray painted everyone's tray with white primer before the class because the wood has grain and dark spots that can show through the painted design. Adding the primer prevents needing to paint numerous coats to cover any dark areas your wood may have.
And as always, safety first when spray-painting {especially if you're spray painting numerous items}.

Step 2: Mark the dill holes
You will notice in my pictures that I painted my tray before drilling, bad idea. The wood is likely to chip a little bit when drilling. Not such a big deal if you're about to paint over it, but if it's already been designed it can really mess up your tray.
Step 3: Drill the holes
Don't worry about the ink showing on the board. Not only are you about to paint over it, but the handles will also cover where the marked holes will be. So now you want to drill right where the marked holes are.
Step 4: Prepare to paint
The way you go about this depends on what design you would like to make. For my red and white striped tray, I simply taped off stripes every few inches using painter's tape. Then painted the exposed area red. Don't forget to paint the sides!
 |
| I did not prime this tray before painting the design, if you look on the top you can see darker shades under the color. |
It's not expected that every paint project will go perfectly, which is why I own paint pens in just about every color. I used these pens to cover small errors and where I painted outside the lines.


Lastly, a couple optional finishes you can add. Either add small felt pads to the bottom of the tray to place over the screws. This will prevent the screws from scratching up any surface and allow the tray to slide nicely on tabletops and counters, OR you can add a Lazy Susan attachment! Now you have a custom made, turning tray, that is also turning heads! :)


Thanks for visiting!

No comments:
Post a Comment
Thank you so much for commenting! All comments are submitted for moderation. Check back soon to view your comment!