For those of you who follow me on Instagram, you may remember me posting a picture of our new dining table a couple weeks ago. In case you missed it, here is a little peek.
 To say I'm obsessed with this table is an understatement. We had it custom made from a shop in Ohio {my home state}, which makes it even more meaningful to me. It's like a little piece of home right here in Connecticut.
Anyway, that's not the point of this post. I couldn't wait to start sitting at our table and adding a little decoration to it. The only struggle was what to add. I wanted something simple that could transition from season to season and something small-ish. I hate it when I can't see the person sitting on the other side of the table. So I went to Pinterest for a little "pinspiration". Here are a few favorites.
We settled on creating something similar to the bottom left photo. A long wooden box that we can fill with different decorations for different seasons and holidays. We decided to make this a DIY project based on how simple it seemed. Just five pieces of wood glued together and painted, no reason to spend more than $20 on it, right?
We picked up a couple pieces of wood at Home Depot, two pieces of 1 in. x 4 in. x 6 ft for $4.62 each. Based on the size of our table {7 feet long, 35 inches wide}, we decided 3 feet long and about 5 inches wide would fit nicely. Brit cut the pieces to size.
 Then it was just a matter of gluing them together. I saw online that some people drilled the pieces together. We definitely could have done this, however I think gluing is so much easier. Maybe I just think that because drilling things scares me a little. Nonetheless, drilling or gluing are both great ways to build this.
I used Gorilla Wood Glue to piece ours together, then clamped the pieces to allow it to adhere nicely.
 After about 30 minutes, it was ready to be painted.
 I impatiently waited for it to dry and ran out to Michael's to find decorative pieces to fill our box. Since it is fall, and really starting to feel like it outside, I picked up some fall inspired items.
 I sanded down the sides and edges of the box to better match the table legs, which are white and lightly sanded as well.
 I filled the box with some Spanish moss, small mason jars with a candle, and mixed pumpkins and gourds {shhh, they're fake, don't tell anyone}.

 I've seen some really cute ideas to paint a little saying along the side, or add handles to the ends. I haven't decided if I want to add more to it or just leave it as is. Any opinions or suggestions?
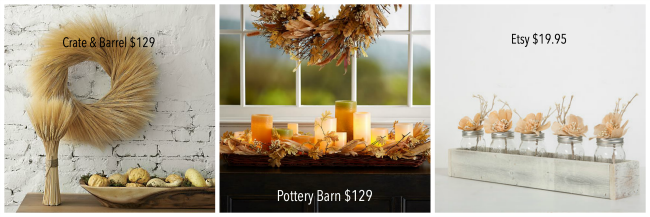
 So for a total of just under $10, we made our own wooden box and filled it for about $15. Not too shabby. I always like to find comparable items for sale somewhere so I can really bask in the savings. Well, Crate & Barrel sells a similar item for $129, and so does Pottery Barn. Or you can pay an extra $10 {plus shipping} to have someone else make it for you from Etsy.
This could also work as a really cute coffee table decoration, or maybe on a mantel. The possibilities are endless :) I hope you're all enjoying a wonderful start to fall!
 Thanks for visiting!
Anyway, that's not the point of this post. I couldn't wait to start sitting at our table and adding a little decoration to it. The only struggle was what to add. I wanted something simple that could transition from season to season and something small-ish. I hate it when I can't see the person sitting on the other side of the table. So I went to Pinterest for a little "pinspiration". Here are a few favorites.
 |
| via / via / via / via |
We picked up a couple pieces of wood at Home Depot, two pieces of 1 in. x 4 in. x 6 ft for $4.62 each. Based on the size of our table {7 feet long, 35 inches wide}, we decided 3 feet long and about 5 inches wide would fit nicely. Brit cut the pieces to size.
I used Gorilla Wood Glue to piece ours together, then clamped the pieces to allow it to adhere nicely.

 |
| via / via / via |


Great project! Can I ask how you chose your centerpiece to table size? I have a 78 x 39" table and I'm considering using something in proportion.
ReplyDeleteHi Molly! Thank you so much! There was really no rhyme or reason to the size we chose. I figured allowing 2 feet of space on either end would be enough to allow someone to sit at the ends of the table without it getting in their way, and the piece wouldn't look too small for the 7ft table. Thank you for reading, let me know if you have other questions :)
Delete