Hello again! Can I just tell you, the past two weeks I have been doing happy dances all around. I don't think I say it enough, but I absolutely love hearing your organizing and creative stories. When something that I have shared has inspired you, it seriously makes my day. So I just wanted to say thank you! Thank you for reading and for sharing.
Ok, now time to talk about how some of those projects I shared on Wednesday's post came together.
THE CHAIR FROM HEAVEN
I'm going to start with something I actually didn't address on Wednesday, but I am over the moon about. Our new chair.
 We have been looking for a new desk chair for years. It's pretty sad actually. Who takes that long to purchase a desk chair? But, it's really been a struggle. We wanted to find the "perfect" chair for this space and didn't think we were asking too much. Here was our list of requirements:
Getting a new chair wasn't really a priority of ours, so it got bumped to the bottom of the list quite frequently. However, I got a huge kick of motivation when I was asked to share my workspace. I finally decided to get my act together and replace our old, broken {the back of the chair was broken and every time we leaned back it was a gamble if we were going to end up on the floor or not}, and not so ideal chair. My ideal situation was finding an old {and cheap} chair that I could spruce up and add into our space. Brit and I perused 4 different thrift stores in the city and basically came away only liking one, that was going to cost over $50 and needed a lot more upholstery work than I am capable of.
.jpg) So, feeling a little down, I stopped in some restaurant supply shops on my way home from work one day. I found this guy {in white} for $52. I liked him. Didn't love him, but was so ready for a new chair I was willing to sacrifice my perfect fixer-upper chair for a new, never-been-used chair.
So, feeling a little down, I stopped in some restaurant supply shops on my way home from work one day. I found this guy {in white} for $52. I liked him. Didn't love him, but was so ready for a new chair I was willing to sacrifice my perfect fixer-upper chair for a new, never-been-used chair.
.jpg) I shared the picture with Brit for final approval, and decided to head back the next day. After work, I strolled toward the store but was distracted when I saw a Yard Sale sign, mainly because not many people have yards in NYC so a yard sale is very out of the ordinary. It ends up it was just a vacant apartment building full of old furniture for sale. I popped in, scanned the room and didn't see anything that interest me. Just before walking out though, I saw another room off to the side. I peered in and it's like a spotlight was shinning down on this lone white chair. Within 30 seconds I had handed the seller the $20 he was asking for it {probably could have negotiated that down a bit but I was too elated to even try} and walked out the door with our new desk chair.
I shared the picture with Brit for final approval, and decided to head back the next day. After work, I strolled toward the store but was distracted when I saw a Yard Sale sign, mainly because not many people have yards in NYC so a yard sale is very out of the ordinary. It ends up it was just a vacant apartment building full of old furniture for sale. I popped in, scanned the room and didn't see anything that interest me. Just before walking out though, I saw another room off to the side. I peered in and it's like a spotlight was shinning down on this lone white chair. Within 30 seconds I had handed the seller the $20 he was asking for it {probably could have negotiated that down a bit but I was too elated to even try} and walked out the door with our new desk chair.
 I'm not sure if you can tell here, but she's quite dirty.

I cleaned her up with some Murphy's wood cleaner and water, used a touch up paint pen to fill in some chips, and voila! We have our perfect desk chair!
There are still a few dings and scratch marks on the chair, which we could cover up with a fresh coat of paint, but we kind of like the character it adds. I feel like this chair came from the heavens to me and just proves that patience in purchasing it totally worth it!
SHADOW BOX
I've done some strange things with projects, but making a shadow box from a cheese knife set is probably one of the strangest. Let me explain.
 We have this cheese knife set, which we use {along with the 2 other sets we have. Can one have too many cheese knives?} but it wasn't really necessary to continue to store them in the case. Using a hammer, I knocked out the center bit of wood holding the knives in place. Then I gave it a light coat of yellow spray paint {same one used here}
 I added a navy piece of cardstock {left over from all those wedding projects} as a dark background to really make the flowers pop.
 Just to give you some background, I wasn't able to save my entire bouquet, as some people do. By the time I got home and would have been able to have it professionally preserved, it had "survived" a week at the beach and a 13 hour roadtrip home. However, I plucked three roses that were still in tact and the ten Craspedia Billy Balls {or is it Bobs?} specially added to the bouquet. We had asked that ten flowers be added to my bouquet in honor of those loved ones who couldn't be with us to celebrate our day. So those specific flowers were very meaningful to me.
I added the flowers to the shadow box by gluing the back of them to the cardstock. The Craspedia are simply placed in the bottom.
 The "glass" is actually just the clear plastic lid that slides into place on the knife set. Now, in order to get this thing to stand up, I used the same method I used for our wedding menus.
 I absolutely love this and looking at it makes me not only think of our wedding day, but also some very dear family members. It's also small enough to easily be put on display almost anywhere. I'm not sure I would have the same luxury if I had my entire bouquet preserved.
KATE SPADE GIFT BOX
Kate Spade gift boxes are too pretty to just throw out, in my opinion. So I hung onto this one until I could find a good use for it.
 Then suddenly, when going through some other trinkets I've held onto for the exact same reason, my Kate Spade box met her match.
 This little guy was pinned onto a gift bag I received at Christmas and I just couldn't bring myself to simply toss the bag {I accidentally ripped the bag so reusing it was not possible}. So I pulled it off and tucked it away until now.
I hammered two holes into the top of the box so that the pin could slide in.


CRAYON ART
I have already received a ton of feedback about this crayon art, it really makes me wish my past self would have known I would be writing a blog post on it one day so I would have taken some pictures of the process for you. Alas, I have none {maybe I'll just have to make another one}. This project is super simple though, so pictures really aren't even necessary.
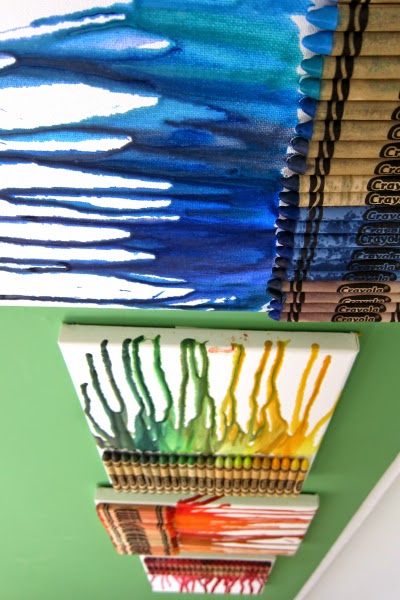 All you need is crayons, a blank canvas, glue gun, and a hairdryer. Glue the crayons to the canvas in whatever shape or design you prefer. Take the canvas to the bathroom and place it in the tub. Seriously. I put a trash bag down just in case the wax would stain our tub. Lean the canvas against the side of the tub and start drying. Wave the dryer slowly back and forth across the lower part of the crayon. It takes a couple minutes to start melting the wax, but within 5 minutes you will have colors flowing and mixing into a beautiful design. The melted wax dries within minutes. The entire project probably took me no more than 30 minutes, and that's only because I took extra long to glue each crayon down, making sure the Crayola was facing up.


 This project is so easy and fast, and a perfect project to do with children {other then the hot glue part}.
Whew, that was a long one! Thanks for sticking through until the end. Do you have any special projects on display in your workspace? Have you ever done anything as weird as use a knife case for a shadow box? Please keep sharing your stories so that my happy dances can continue indefinitely.
Thanks for visiting!
Ok, now time to talk about how some of those projects I shared on Wednesday's post came together.
THE CHAIR FROM HEAVEN
I'm going to start with something I actually didn't address on Wednesday, but I am over the moon about. Our new chair.

- it needed to match the room, color wise {maroon and black weren't really the colors we were going for}
- it needed to fit in with a fluffy white couch, a chrome and glass desk, and a wooden coffee table.
- no rollers {the old chair would get caught up in the rug constantly, it drove me bonkers!}
- not be broken
- be at least a little bit comfortable
Getting a new chair wasn't really a priority of ours, so it got bumped to the bottom of the list quite frequently. However, I got a huge kick of motivation when I was asked to share my workspace. I finally decided to get my act together and replace our old, broken {the back of the chair was broken and every time we leaned back it was a gamble if we were going to end up on the floor or not}, and not so ideal chair. My ideal situation was finding an old {and cheap} chair that I could spruce up and add into our space. Brit and I perused 4 different thrift stores in the city and basically came away only liking one, that was going to cost over $50 and needed a lot more upholstery work than I am capable of.
.jpg)
.jpg)


I cleaned her up with some Murphy's wood cleaner and water, used a touch up paint pen to fill in some chips, and voila! We have our perfect desk chair!
 |
| Do you see how it glows? It may be sunshine beaming through the window, but I choose to believe otherwise. |
SHADOW BOX
I've done some strange things with projects, but making a shadow box from a cheese knife set is probably one of the strangest. Let me explain.


I added the flowers to the shadow box by gluing the back of them to the cardstock. The Craspedia are simply placed in the bottom.


KATE SPADE GIFT BOX
Kate Spade gift boxes are too pretty to just throw out, in my opinion. So I hung onto this one until I could find a good use for it.
I hammered two holes into the top of the box so that the pin could slide in.

Now we have a perfect little box where we keep the extra currency from our travels abroad. It's kind of like a hope jar, like one day we'll go back to these amazing places and be able to use this money we've saved.
CARD HOLDER
This is actually another Kate Spade box, but it's not nearly as pretty so I added a little flare. I had this bracelet that was held together by a thread {literally}.

When I was finally able to admit it was no longer wearable, I decided to have it serve another purpose. I cut the thread and pulled the bracelet apart. Then I hot glued it to the front of the lid on this stationary box.
I don't have any pictures of before and after, but I think it's pretty self explanatory, right?
I have already received a ton of feedback about this crayon art, it really makes me wish my past self would have known I would be writing a blog post on it one day so I would have taken some pictures of the process for you. Alas, I have none {maybe I'll just have to make another one}. This project is super simple though, so pictures really aren't even necessary.
Whew, that was a long one! Thanks for sticking through until the end. Do you have any special projects on display in your workspace? Have you ever done anything as weird as use a knife case for a shadow box? Please keep sharing your stories so that my happy dances can continue indefinitely.
Thanks for visiting!

No comments:
Post a Comment
Thank you so much for commenting! All comments are submitted for moderation. Check back soon to view your comment!