Do you see all of those stains and the yellow tint? I decided that my grandmother would not have wanted me to keep this embarrassing box as a tribute to her, so I risked possibly destroying the jewelry box, and got out the spray paint. I used Rust-Oleum's Painter's Touch Gloss White, the same paint that I used here and here, to spray the exterior.
I tested the paint on the bottom of the drawer before I started. I tested white, and then I tested gold. Don't ask me what I was thinking, just be glad I decided to go with white.
I painted the top center piece, nearly had a panic attack because I was so scared I would destroy it, and look!! It actually turned out ok! I was amazed at how easily the paint covered up all of the damages and stains. 

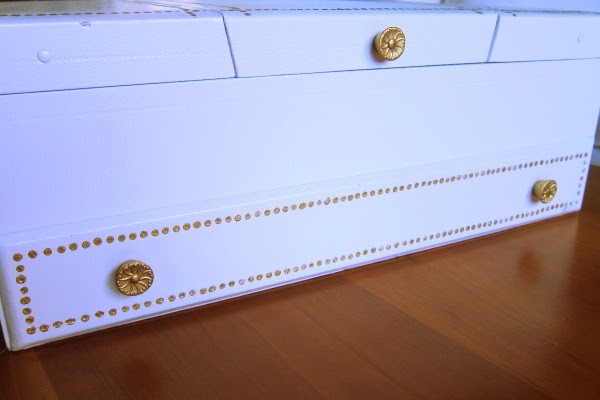
One of my favorite things about this jewelry box was the details. I loved the small gold dotting going around the sides, as well as the little knobs of the drawer and lid.
I absolutely love how the Gold Leaf reacted with the paint and material of the jewelry box.
It created a somewhat cracked look, which really added to the detailing.
I used the gold leaf to also paint over the little knobs and handles.
I am so excited about how it turned out, but I still wasn't quite finished. The inside needed a little love as well.
I covered all of the interior with paper and tape so that I could paint the edges inside. Of course it didn't work perfectly, if you look closely you can see the back wall is still yellowed, but I was too nervous to get that close with a can of spray paint. So it's going to stay looking like this for the time being.
The one thing that I didn't like too much about this jewelry box was the lack of a ring organizer and that my earrings were frequently losing their mate. Using some protective foam from a shipment box... Let me be more specific, especially since I never took a picture of it... ugh. We had to purchase a new computer and in the box there was protective foam to prevent the computer from shifting too much during shipment {anyone know what I'm talking about?} Anyway, I grabbed a big piece of the foam, cut it to size, and then cut little slits into it to create my own organization in the jewelry box.
I tucked the backs of the earrings into the slits to keep them in place. I own a few pairs of clip on earrings {some that were my grandmother's as well} so I left two spaces open to store the clip ons.
I am so glad that I didn't completely destroy the jewelry box. It still serves as a constant reminder of my grandmother, but now in a beautiful way that she deserves.
Cost: Free! I had the paint supplies already on hand.
Time: I'm not going to lie, this one took a while. The dots were time consuming. It took several hours for the paint to dry and then dot each boarder. I did develop a bit of a rhythm after a while and it wasn't difficult to do, just time consuming. Totally worth it for the result, though!
Have you ever taken an old family item and updated it? What do you use to store your jewelry?
The one thing that I didn't like too much about this jewelry box was the lack of a ring organizer and that my earrings were frequently losing their mate. Using some protective foam from a shipment box... Let me be more specific, especially since I never took a picture of it... ugh. We had to purchase a new computer and in the box there was protective foam to prevent the computer from shifting too much during shipment {anyone know what I'm talking about?} Anyway, I grabbed a big piece of the foam, cut it to size, and then cut little slits into it to create my own organization in the jewelry box.
I tucked the backs of the earrings into the slits to keep them in place. I own a few pairs of clip on earrings {some that were my grandmother's as well} so I left two spaces open to store the clip ons.
I used the same foam and slit process for one of the drawer sections to create my own ring holder.
I am so glad that I didn't completely destroy the jewelry box. It still serves as a constant reminder of my grandmother, but now in a beautiful way that she deserves.
Cost: Free! I had the paint supplies already on hand.
Time: I'm not going to lie, this one took a while. The dots were time consuming. It took several hours for the paint to dry and then dot each boarder. I did develop a bit of a rhythm after a while and it wasn't difficult to do, just time consuming. Totally worth it for the result, though!
Have you ever taken an old family item and updated it? What do you use to store your jewelry?


WOW! Beautiful jewelry pieces I must say. It is nice to see the latest summer jewelry collection. The earrings, the bracelets and the ring all are just wonderful. I personally like that perfect platinum diamond ring displayed above.
ReplyDeleteStone Items