I grew up in the Midwest, Middletown, Ohio to be exact. In the Midwest it is understood that weather is a mystery. I've been through snow storms on Halloween and Easter, and Christmases that hit near 70. But I truly believed living in the Northeast we would see a little more consistent weather. Winters would be cold and brutal, full of nor-easters {real word, look it up} frigid winds and snow for months. Yet, here are some photos of the past two days.
Wednesday, near 65, sunny, warm, beautiful
 Thursday, near 25, snowy, like over a foot of snow, cold, yet still beautiful. So I really can't complain.

Anyway, I'm always looking for excuses to share photos of this little man. Kinda makes me feel like the near 100 I take during the week isn't for nothing.
In January's CEO Mommy class, these mommas rocked DIY Growth Charts for their little ones. I mean, I know I say this every time but I am always SO impressed with how they make each project their own.
Here's how to make one yourself!
Supplies:
Step 1: Sand/Stain/Paint
This step completely depends on the type of wood you purchase. The wood I bought for my project needed to be sanded and definitely either painted or stained. It was about as cheap as it comes and needed a lot of love.
 To sand it I used a round sander. Then I painted it with a sample of off white paint.
 The wood we used for the class, however, was a little bit more expensive but was ready to go right from the store, no sanding needed. It could still be painted or stained if desired but it wasn't required.
Step 2: Measure
First you will want to figure out where you want to hang your chart, if at all. If it's going to be flush with the ground, or leaned against a wall, your chart will start at zero. If you want to hang it up on the wall, you should measure at least how high your baseboards go, then begin your chart from that point.
For example, our baseboards are 5 inches high. So in order to make the chart accurate, the measurements need to begin at 5 inches. I decided I'd hang mine about half an inch above our baseboards so my measurements actually begin at 5.5 inches.

Step 3: Draw Ruler Lines
It's best to do this process in pencil first, then follow up with paint pens or a paint brush. Simply use your ruler to tick off the inches and foot lines. I marked off every inch and made every six-inch and foot line slightly longer. Here's how I broke it down, but each momma did something different so it's really up to you and your personal preference!

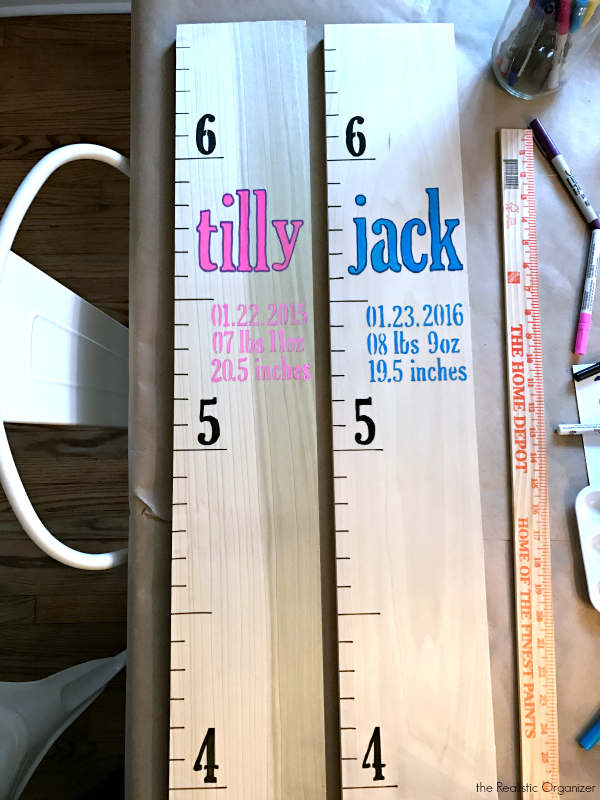
Step 4: Stencil
Using pencil, stencil in the foot-numbers first, that way you can ensure there is space for your child's personalization. You can stencil them in however you'd like. I chose to put mine about halfway down the foot line, horizontally. But you can also stack in on the foot line vertically. This allows more space for personalization as well.
 Next, stencil your child's personalization. I chose to include name, DOB, height and weight. Some mommas included time, or chose to only have their child's name.
Once your stencil is traced on the board, go over it with either a paint pen or paint brush. If you're using a lighter color and don't want the pencil marks to show through, you can lightly erase the pencil before painting. I find this Staedtler eraser to be magical and it doesn't leave any smudge marks!

Step 5: Add Hook
Seriously, the most difficult part of the entire project. I don't know what kind of fingers the manufacturers expect humans to have but oh my gosh this took me forever. The little nails that were included with these hooks are impossible to hold and hammer. It took using tweezers for me get them in. However one momma nailed hers in without any issue at all whatsoever so it's possible there was a lot of user error involved.
 I'm pretty sure picture hanging command strips would work perfectly fine, I just got nervous about how they would adhere to the wood I purchased. Anyone wanna try it and let me know? I'm certain that is a much easier alternative than tweezers and nails.
 Now simply hang up your growth chart! You can add previous years of height to any children who are over one year old and you aren't measuring for the first time. If you haven't documented their height each year on your own, your pediatrician will have that information on file. Just call up and say that you are a rock star momma and just DIY'd your child a growth chart {allow time for oohs and ahhs} and ask for the height information from previous years.
Did any of you have a growth chart when you were young? Many of the moms shared that they were always measured on a door jam, but when their family moved, all was lost. The great thing about these charts is when your family needs more, or less, space they can easily go with you without losing years of family memories.

Thanks for visiting!
Wednesday, near 65, sunny, warm, beautiful
Anyway, I'm always looking for excuses to share photos of this little man. Kinda makes me feel like the near 100 I take during the week isn't for nothing.
In January's CEO Mommy class, these mommas rocked DIY Growth Charts for their little ones. I mean, I know I say this every time but I am always SO impressed with how they make each project their own.
Here's how to make one yourself!
Supplies:
 |
Step 1: Sand/Stain/Paint
This step completely depends on the type of wood you purchase. The wood I bought for my project needed to be sanded and definitely either painted or stained. It was about as cheap as it comes and needed a lot of love.
Step 2: Measure
First you will want to figure out where you want to hang your chart, if at all. If it's going to be flush with the ground, or leaned against a wall, your chart will start at zero. If you want to hang it up on the wall, you should measure at least how high your baseboards go, then begin your chart from that point.
For example, our baseboards are 5 inches high. So in order to make the chart accurate, the measurements need to begin at 5 inches. I decided I'd hang mine about half an inch above our baseboards so my measurements actually begin at 5.5 inches.
Step 3: Draw Ruler Lines
It's best to do this process in pencil first, then follow up with paint pens or a paint brush. Simply use your ruler to tick off the inches and foot lines. I marked off every inch and made every six-inch and foot line slightly longer. Here's how I broke it down, but each momma did something different so it's really up to you and your personal preference!
- 1 inch lines: approximately 0.5' long
- 6 inch lines: approximately 1' long
- foot lines: approximately 2' long
Step 4: Stencil
Using pencil, stencil in the foot-numbers first, that way you can ensure there is space for your child's personalization. You can stencil them in however you'd like. I chose to put mine about halfway down the foot line, horizontally. But you can also stack in on the foot line vertically. This allows more space for personalization as well.
 |
| This one includes her adopted nephew's date of birth and adoption date, love, love, love! |
Step 5: Add Hook
Seriously, the most difficult part of the entire project. I don't know what kind of fingers the manufacturers expect humans to have but oh my gosh this took me forever. The little nails that were included with these hooks are impossible to hold and hammer. It took using tweezers for me get them in. However one momma nailed hers in without any issue at all whatsoever so it's possible there was a lot of user error involved.

 |
| Full disclosure, mine isn't completed!! I got so far one night then just stopped before I filled in James' birth year. I was just to tired to keep going. We decided to hang it up so we could measure him on his birthday and well, there it has stayed. I do plan to get to it one day. Someday. |

Thanks for visiting!

No comments:
Post a Comment
Thank you so much for commenting! All comments are submitted for moderation. Check back soon to view your comment!