Around this time last year I was nesting super hard. And I created a nice cozy nest of DIY projects such as the Nursery Art, Wooden Blocks, and this incredible advent calendar. Now, don't get me wrong, creating your own advent calendar is totally doable and you do not need to be a crazed prego to achieve it. Today I want to share with you how I created ours, but also how to create other simple advent calendars as well.
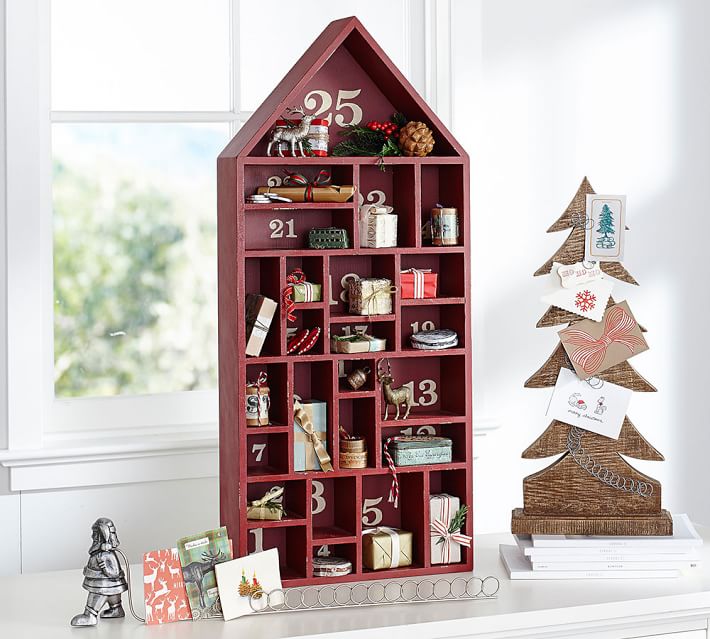
I was inspired by this House Advent Calendar from Pottery Barn {no longer available}, however, like most things from Pottery Barn, I felt that it was overpriced and that I could make one similar.
I used some plywood leftover from a furniture shipment we had received. It's cheap wood, but it's thin and easy to cut, and we had tons of it. I created a design and did some crazy math that makes my head hurt even thinking about it now.
This one is a bit clearer
 |
| 5 x 16 inches = five pieces at 16 inches in length. Each piece is about four inches wide |
I didn't want basic cubes, I liked the uniqueness of each opening from the PB piece, hence the numerous cuts. You could easily make this a lot faster by having three main rows and five or six columns. But again, I was nesting so I needed everything to be as difficult and detailed as possible.
Brit used his table saw to do each cut. The wood we used was only 1/4" so we could have used a hand saw easily, but because of the numerous cuts the table saw was a lot faster.
Once the pieces were cut, I put them together to ensure everything would fit nicely. The one teeny, tiny thing I forgot about when measuring each section was to leave room for the actual wood. Meaning, when I measured I didn't account for the 1/4" the wood would take up. Oops. I actually only needed to cut down the four 15 inch pieces to make everything fit. Thank goodness. Lesson learned.
I used Gorilla Wood Glue to adhere each piece together. The glue dries fairly quickly and the wood is so light it was easy to do it all at once, versus one piece at a time and wait for dry time in between.
Once the frame and cubbies were complete, I took it outside to apply two coats of spray paint.
I used Rust-Oleum's Colonial Red spray paint.
Of course I ran out about halfway through. I had used the paint for a previous project and forgot to buy more, hence the half painted frame in the photos below.
I filled each cubby with boxes made from my silhouette cutter. The boxes come together easily after the cutter prints them, just apply a little glue and you have a box. If you don't have a Silhouette cutter, or you don't feel like messing with creating your own, you can snag these little gift boxes from Amazon for under $6.
Once I had the boxes in the cubbies, I numbered them, again with cut outs from my Silhouette. Simple number stickers are a great alternative. I finished spray painting the frame and applied the numbers. Here's the finished product!
I filled each box with candy as well as a Bible verse from birth of Jesus. As James and baby number 2 get older the boxes will start to get filled with toy cars and army men, or whatever little boys play with these days. But for now, Brit and I will just enjoy eating delicious chocolate candy.
This is by far my very favorite DIY project I've ever completed. The advent calendar alone means so much to me, but also being able to look at this each year and know that we made it {with some inspirational help from PB} just warms my heart.
I scattered the boxes so they're not in sequential order, as per Brit's request. He likes the added challenge I trying to find the correct box.
 |
| Photo taken last year. We still have pumpkins on our front porch... don't judge. |
If you want to make your own and want to make it within the next two days, as the Christmas countdown begins on Thursday, here are some very easy alternatives you can create for your family.
I hope you all had a wonderful Thanksgiving holiday and aren't feeling too bombarded with holiday festivities yet. 27 more days until Christmas... :)
Thanks for visiting!
 I used some plywood leftover from a furniture shipment we had received. It's cheap wood, but it's thin and easy to cut, and we had tons of it. I created a design and did some crazy math that makes my head hurt even thinking about it now.
 Once the pieces were cut, I put them together to ensure everything would fit nicely. The one teeny, tiny thing I forgot about when measuring each section was to leave room for the actual wood. Meaning, when I measured I didn't account for the 1/4" the wood would take up. Oops. I actually only needed to cut down the four 15 inch pieces to make everything fit. Thank goodness. Lesson learned.
 I used Gorilla Wood Glue to adhere each piece together. The glue dries fairly quickly and the wood is so light it was easy to do it all at once, versus one piece at a time and wait for dry time in between.
 I used Rust-Oleum's Colonial Red spray paint.
  Of course I ran out about halfway through. I had used the paint for a previous project and forgot to buy more, hence the half painted frame in the photos below.

 I filled each box with candy as well as a Bible verse from birth of Jesus. As James and baby number 2 get older the boxes will start to get filled with toy cars and army men, or whatever little boys play with these days. But for now, Brit and I will just enjoy eating delicious chocolate candy.
  This is by far my very favorite DIY project I've ever completed. The advent calendar alone means so much to me, but also being able to look at this each year and know that we made it {with some inspirational help from PB} just warms my heart.
  I scattered the boxes so they're not in sequential order, as per Brit's request. He likes the added challenge I trying to find the correct box.


No comments:
Post a Comment
Thank you so much for commenting! All comments are submitted for moderation. Check back soon to view your comment!