Hey guys! Some serious progress has been made in our apartment over the last couple of weeks. The bar has been completely removed. The floors have been fixed-ish {we have some areas where I'm pretty sure the guys just got tired, but we'll address that later}. And we have fresh paint on almost all of the walls. We've been working to make the apartment look like a home people would just love to buy {please, please, please buy it}.
 You may remember me talking about wanting to save the mirror from the bar so we could get a little creative with it. Well, there were motivating factors other than just creativity. It was going to cost us $1,000 just to remove it. Or we had the option of doing it ourselves, which would have required us to shatter the mirror and deal with the tar that was holding the mirror in place. No thank you. We'll keep it just the way it is.
 Ok, not really "just the way it is". It needed a little lovin', after all, the mirror is at least 50 years old {based on how old the bar was}. It needed some serious Windex attention for starters. The picture below doesn't quite pick up the paint lines and dust that was covering the mirror, especially in the place where the shelves were, but with a little elbow grease it cleaned up nicely.
 What it really needed though was a frame. Something to shape the mirror a little nicer and give it a more bold appearance. Brit and I really didn't want to pour a bunch of money into this but we also didn't want it to look like it was done super cheap. We took a trip to Home Depot and picked up moulding for $5.80 a piece. Due to the size of the mirror, 68x43, we had to purchase 4 pieces, we would have been about 1 inch off on each side if we split one piece, which was our original plan. But for under $6, we weren't too upset about it.
 We did have to be very selective about which ones we used. Many of the pieces were warped and bent. This is probably not a problem when you're nailing the moulding to a wall, but for our purposes warped and bent just wouldn't do.
Brit got right to work cutting 45 degree angles at the ends of each piece. He used a hand saw and miter box, which can also be picked up at Home Depot for about $5, to cut the perfect 45 degree angles.
 We used Gorilla wood glue and Elmer's wood filler to hold the corners together to create the frame.
 We clamped each end together for about 30 minutes to allow the glue to dry. Then applied wood filler where necessary. Brit was able to cut such perfect angles, there was really only one corner that needed a little filler.

 We let the filler set for about 20 minutes, then sanded the area down. We used a dark filler because we planned to paint the frame black. This color was about as dark as we could find.
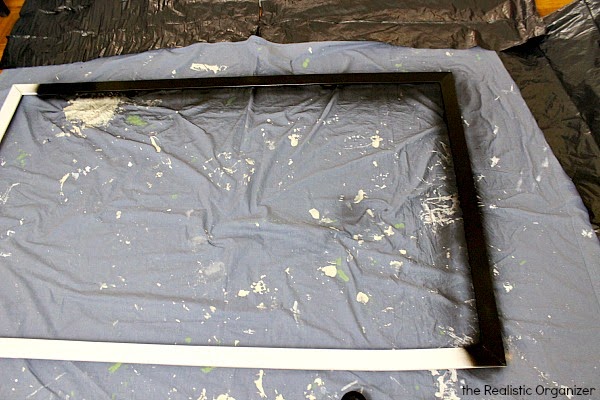
We used Rust-Oleum's Semi-Gloss Black spray paint to coat it. We wanted to use spray paint for this because we really wanted to paint it in the fastest way possible. I cut up an empty paper towel roll to raise the frame while painting. Here it is about halfway finished.
 We used just about the entire can of spray paint for the frame. We started getting ready to hang it and realized because we're framing a mirror, which reflects, we needed to paint both sides of the frame. Duh. So we lowered it back down and painted the back.
 We had no idea how much the wood grain would show through once we painted it darker, but I absolutely love it!
We used black Command picture hanging strips to hang the frame around the mirror. The entire frame probably weighed about 2 lbs., but we were playing it safe with this one and purchased the 12 lb. strips.
 It was so simple to hang it up, with a little help from Brit to make sure it was level. I am so happy with the result!


 We still have more work to do, for example, adding an actual light. I mean, maybe some new home buyers will like the raw look of this, but I'm not sure we want to appeal to only that niche market.
 Here's a look at how far we've come though.
 Can you even believe it's the same space? Like, whoa. Right? We moved our dining table and chairs over to the new open space. This also allowed us to spread the living room furniture a little further to really open that space as well.
 I guess you can't really tell in the picture, but we gained about two extra feet. Also, the green room is no longer green. Serious sad face on that one, but again, we'd really love for this place to sell quickly and green isn't exactly everyone's color.
 There is definitely a lot of white in that room now. We're still working on adding a little more color.
So, what do you think of the mirror and the progress? Have you thought about framing a mirror in your home, like maybe that large bathroom mirror with no personality?
 Thanks for visiting!
Brit got right to work cutting 45 degree angles at the ends of each piece. He used a hand saw and miter box, which can also be picked up at Home Depot for about $5, to cut the perfect 45 degree angles.
We used Rust-Oleum's Semi-Gloss Black spray paint to coat it. We wanted to use spray paint for this because we really wanted to paint it in the fastest way possible. I cut up an empty paper towel roll to raise the frame while painting. Here it is about halfway finished.
We used black Command picture hanging strips to hang the frame around the mirror. The entire frame probably weighed about 2 lbs., but we were playing it safe with this one and purchased the 12 lb. strips.

So, what do you think of the mirror and the progress? Have you thought about framing a mirror in your home, like maybe that large bathroom mirror with no personality?


No comments:
Post a Comment
Thank you so much for commenting! All comments are submitted for moderation. Check back soon to view your comment!