DIY Sunburst Mirror | Anthropologie Hack
Have any of you been eyeing these sunburst mirrors like me? I absolutely love them. I have been hunting for one to add to our home. However, I wanted to add one without forfeiting a lot of dough.
This one from Anthropologie, for example, fell in love with right away. But I just could not bring myself to fork over $100 for it. I mean, it's just a tiny mirror with some wire, right?
Then it came to me. While I was conducting another 5 Minute Closet Cleanup, I found myself holding about 20 wire hangers that had not made their way to the garbage yet. Wheels started turning, ideas were forming, the coveted sunburst mirror was right at my fingertips.
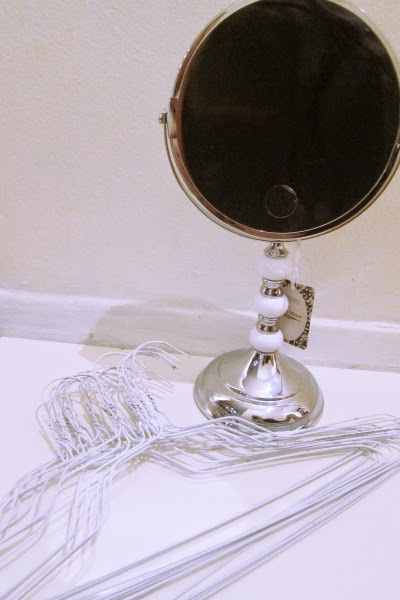
I picked up a vanity mirror at TJ Max for $14.99 to use as the center. I removed the mirror from the stand by simply unscrewing it. Then I got out the wire cutters and started cutting up hanger.
I cut the hanger in the center of the base, then started manipulating the wire. I twisted the cut end to the top of the hanger, making little loops {or beams, if you will}
Using the wire cutters again, I removed the hook of the hanger so I had about 40 separate pieces.
I placed the hanger pieces around the mirror to get an idea what the final product would look like. I was loving this so far!
 I used Epoxy to adhere the hanger pieces to the back of the mirror. This stuff stinks to all get out, but it works. Originally, I just used the syringe as is to apply the epoxy, without mixing the resin and hardener any further. I figured they would mix well enough if I applied it in a circular motion. Nope. Not well enough at least.
So thanks to the brains of Mr. Brit, I mixed the Epoxy in a foil covered dish, then applied it using a q-tip. This is clearly not the preferred method, but it saved us from having to ruin a paintbrush or any other method of applying the epoxy. Oh, and it works!
I removed the magnifying mirror from the reverse side, and used it to close off the back. I flipped it over and added some more Epoxy to hold it down. When doing this, be sure to angle the mirror away from you. It's terrifying to accidentally catch a glimpse and realize that yes, that is actually what the inside of your nose looks like.
It takes a little while for the Epoxy to dry, and you're supposed to clamp the pieces together while it's drying. Well, we don't own a clamp, so we used canned food and weights. Close enough right?
This worked perfectly fine, but my-impatient-self had to intervene and start testing it to see if it actually was perfectly fine. Don't do that. Just wait. The more you mess with it the longer it takes. Just sit back and breathe.
Finally, I was ready to spray paint this bad boy and throw it on the wall. I decided to go with yellow paint, because I liked the way it looked in our bedroom with grey walls. But I also really want to try it in gold. Maybe that will be a part two.
The final product is super lightweight, {thank you wire hangers} so I was able to hang it using two Command hooks and a paperclip. Yes, a paperclip. Brit did an amazing demonstration for me, showing just how strong paperclips are, by hanging a 25 lb weight with one little paperclip! Who knew?!

I had to bend the hook placed on the back of the mirror a little bit {aka Brit did with a pair of pliers}, so that it would rest nicely against the wall.
I don't know why we don't use paperclips for often to hang lightweight things. It was so easy to hang it up {unlike picture frames with their impossible small triangle hooks that never seem to locate the nail}.
If you stand just right, you can catch a glimpse of a little piece of artwork I made for Brit a few years ago. It had been hanging in our bedroom before we painted, and we just never got around to putting it back up.
It's back up now and matches perfectly with the sunburst mirror.
 I just love the way the yellow pops off of our grey walls. It really looks like a ray of sun.
So, what do you think? Are you willing to create your own sunburst mirror?
I just love the way the yellow pops off of our grey walls. It really looks like a ray of sun.
So, what do you think? Are you willing to create your own sunburst mirror?
Have you recreated a desired object anything for less? Have a happy {and safe} Halloween!
Thanks for visiting!


No comments:
Post a Comment
Thank you so much for commenting! All comments are submitted for moderation. Check back soon to view your comment!